Instructor/Reporter Summary Guide
The purpose of this document is to provide you with a summary of the functions that you as an instructor and/or reporter can perform on the Instructor/Reporter user interface. To get a complete comprehensive look at any of the functions described within this document, please refer to the GoogleDocs link listed under the left-side navigation menu of Links. It will take you to a list of reference documents where you can find information on any subject. Each section below will point you to the appropriate document within the Supplemental Guide.
What Capabilities or Permissions an Instructor/Reporter Can Have
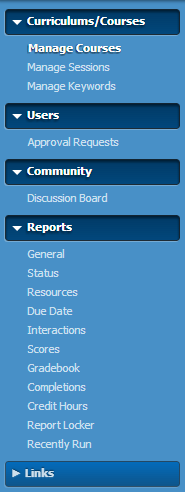
As an Instructor and/or Reporter, you will either have the standard set of permissions or an additional set of permissions. The following left navigation menu is what you will see after logging in if you have the standard set of permissions.
|
-
View and update the courses/sessions for which they are an Instructor/Reporter (updating courses, changing notifications, updating course content, issue grades for students in their courses, register students in their courses, and mail students registered in their courses)
-
Approve/Deny requests for enrollment from their potential students for their courses
-
Comment on discussion boards related to their courses.
-
Run reports only related to their courses, curriculums, or users
|
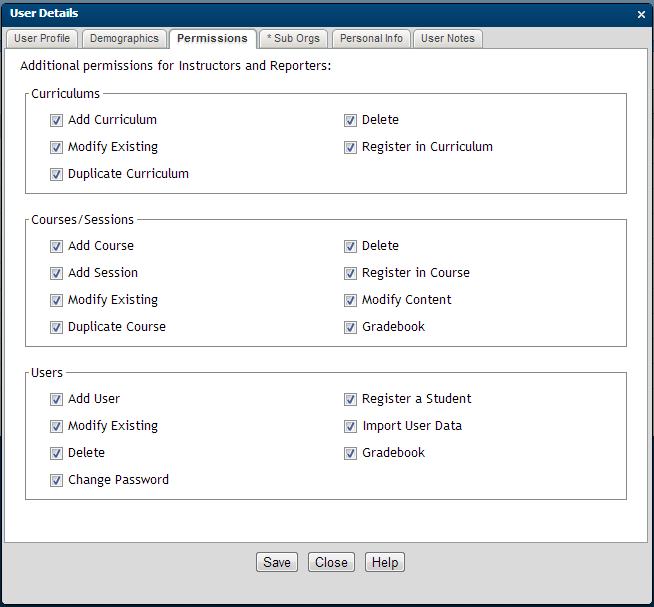
In CourseMill, there are numerous additional responsibilities that can be given to instructors and reporters. These responsibilities can be found on the Permissions tab of the User Details dialog.
-
For curriculums, you can be given the permission to:
| Add Curriculum |
The user can add a curriculum. |
| Modify Existing |
The user can modify the details of the curriculum. |
| Duplicate Curriculum |
The user can duplicate a curriculum from an existing curriculum. |
| Delete |
The user can delete the curriculum.
|
| Register in Curriculum |
The user can register students in the curriculum. |
-
For courses/sessions, you can be given the permission to:
| Add Course |
The user can add a course. |
| Add Session |
The user can add a session. |
| Modify Existing |
The user can modify the format details of the course and its sessions.
|
| Modify Content |
The user can modify the content of the course.
|
| Delete |
The user can delete the course and sessions. |
| Register in Course |
The user can register students in the course and session. |
| Modify Content |
The user can modify the content of the course. |
| Gradebook |
The user can grade any students in any course. |
-
For users, you can be able to:
| Add User |
The user can add a user. |
| Modify Existing |
The user can modify the details of the user. |
| Delete |
The user can delete the user. |
| Change Password |
The user can change a user’s password. |
| Register Student |
The user can register a student in any course/session or curriculum. |
| Import User Data |
The user can import user data. |
| Gradebook |
The user can grade any students in any course. |
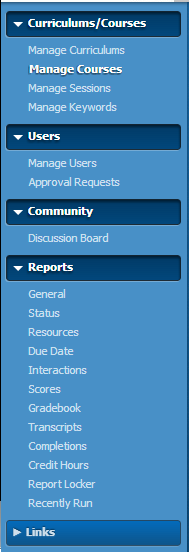
If you are given all of the above permissions, you will land on the Manage Courses page after logging in and the left navigation menu will be as shown:
|
The instructor/reporter having all the permissions will now have the additional menu options of Manage Curriculums, Manage Users and one extra report option – Transcripts.
|
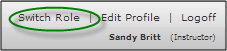
The user interface for an instructor/reporter provides a Switch Role button next to your log-in to navigate between the student interface and instructor/reporter interface screens.
The remainder of this document provides instruction for ALL of the capabilities on the instructor/reporter interface, however, you may or may not be able to perform an operation, based on the permissions you have been given.
Curriculum Management
Our entire document covering curriculum management (Managing Curriculums) can be found in our Supplement Guide library.
In addition to referencing the above manual, the following is a quick list of items to keep in mind, if you are given permission to manage curriculums. These functions can be accessed from the Manage Curriculums menu ribbon across the right top portion of the screen, or by performing a right mouse click on the curriculum listed in the curriculum list.

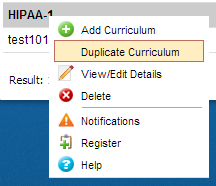
|
Duplicate Curriculum is only visible from the drop-down list. |
Add/View/Edit
-
If you add a new curriculum, check to see if your company is using a standard naming or numbering convention for your Curriculum IDs.
-
If you allow self-registration in a curriculum, your students will see that curriculum on the Course Catalog which will allow them to self-enroll in the curriculum. If you require registration to be approved before the student can be enrolled, check the box labeled Registration Requires Approval in the Curriculum Details.
-
Keywords can be utilized to identify career paths for the organization. For example, a career path for Accounting might be noted as ACCOUNTING. The use of capital letters can provide a visual distinction between content keywords and career path keywords.
Delete
Once records are deleted they can only be recovered from a back-up file. For ELB Learning hosted customers, the last 15 days of activity is readily available as well as Audit reports, available only to administrators that can provide great detail. A warning message is provided during the Delete process requiring the user to confirm the deletion.
Notifications
-
The CourseMill email management service must be enabled for notifications to function. Depending on how your system is set, notifications will come through in one of two ways:
- External Email service - notifications will be mailed to the email address specified in the User profile
- Internal CourseMill email service - notifications will be displayed in the users Mail tab on the student interface
-
Your notifications can be personalized to the particular curriculum you are working with. You may include CourseMill variable names in your message. Click Help to get a list of available variables.
-
Email notifications will be sent from the instructor’s email address. If there are no Instructors, it will come from the administrator’s email address.
Register
When registering students, there might be a large un-manageable list of students to select from. To help narrow this list for selection, use the Filter button to drill down even further and find students more quickly.
Course Management
Our entire document covering course management Managing Courses can be found in our Supplement Guide library.
In addition to referencing the above manual, below is a quick list of items to keep in mind, if you are given permission to manage courses. These functions can be accessed from the Manage Courses menu ribbon across the right top portion of the screen, or by performing a right mouse click on the course listed in the course list.

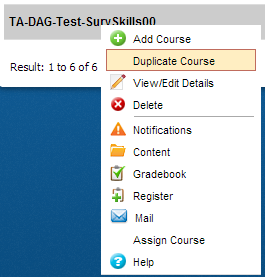
|
Duplicate Course is only visible from this dropdown list.
|
Add/View/Edit
-
If you add a new course, check to see if your company is using a standard naming or numbering convention for your Course IDs.
-
Notes provide an area for the instructors to maintain information on the course. This information is viewable to students.
-
If you allow self-registration in a course, your students will see that course on the Course Catalog which will allow them to self-enroll in the course. If you require registration to be approved before the student can be enrolled, check the box labeled Registration Requires Approval in the Course Details.
-
Depending on what device you are building this course for, you can set up the correct width and height for the display. For instance, for a mobile phone course, you might want to set up your width and height to be 320 by 720. For an iPad, you might use 950 by 650. If you select the Re-size check box, the user will be able to re-size the screen on the specific device.
-
Keywords can be utilized to identify Career Paths for the organization. For example, a career path for Accounting might be noted as ACCOUNTING. The use of capital letters can provide a visual distinction between content keywords and career path keywords.
-
The checked Active check box displays the course in the Course Catalog if you allow self-registration. If the course is in development stage, you may want to keep the course inactive so the student cannot see the course in the catalog.
-
Credit Hours allows for credit to be earned for the course.
-
Prerequisites block students from accessing the course content prior to completing other courses in the system. Assigned or self-enrolled courses that require a prerequisite will appear on My Courses, but cannot be accessed (will be grayed out) until the prerequisite is fulfilled.
-
If your system is set up to use external email, and the user does not have an email address, use the user’s manager’s email address in the student’s profile to alert or distribute the messages.
Delete
Once records are deleted they can only be recovered from a back-up file. For ELB Learning hosted customers, the last 15 days of activity is readily available as well as Audit reports, available only to administrators that can provide great detail. A warning message is provided during the Delete process requiring the user to confirm the deletion.
Notifications
-
The CourseMill email management service must be enabled for notifications to function. Depending on how your system is set, notifications will come through in one of two ways:
- External Email service - notifications will be mailed to the email address specified in the User profile
- Internal CourseMill email service - notifications will be displayed in the users Mail tab on the student interface
-
Your notifications can be personalized to the particular curriculum you are working with. You may include CourseMill variable names in your message. Click Help to get a list of available variables.
-
Email notifications will be sent from the instructor’s email address. If there are no Instructors, it will come from the administrator’s email address.
Content/Resource
-
If you load up SCORM content for a course, and that content has a course description in its title, CourseMill will automatically update the Course Description field in the Course Details.
-
When loading SCORM content into a course, if you check the box “Replace existing Imported Items”, it will replace ALL the Scorm content that was previously loaded. So if you have four SCORM modules loaded into the course and you load a fifth one with the box checked, you will end up with one course – that being the last one you uploaded.
-
Lectora users can publish content directly from Lectora to CourseMill. When this is done, the content package is automatically uploaded into the CourseMill course, and a separate import process is not required. See Processing SCORM-Based Content for Lectora to CourseMill set-up. Also refer to Publishing from Lectora to CourseMill.
-
SCOs are assigned a default name within the authoring tool which passes to the CourseMill Gradebook ID during the import process. Once users are enrolled in the course, if you upload a new version of the course with a different SCO name (Gradebook ID), all history for that student in the original course will be lost.
-
In addition to content, there are also resources. A resource could include a document with assignment descriptions, a course syllabus, or any other supplemental information course participants should have. For any documents that are loaded up into a course, remember to uncheck the Allow Student Access check box if you do not want the students to see it.
Gradebook
-
The Gradebook provides a list of the students enrolled in the course selected from the list along with their session, status in the course and the completion date if the course was completed.
-
For instructions on use of the Gradebook, see Using the Gradebook.
Register
-
If you want to register students for a course you should make it a practice to do it one of two ways:
-
Using the Assign Course button in Manage Courses to auto-enroll groups of students in the course
-
If you are registering one or a few number of students, register them in the Manage Session screen.
-
If there are multiple sessions of the course, when the student attempts to take that course, CourseMill will force them to enroll in a session.
-
When registering students, there might be a large unmanageable list of students to select from.To help narrow this list for selection, use the Filter button to drill down even further and find students more quickly.
Mail
-
The Mail button will allow you to mail any or all the students that are registered in the course. You can copy yourself on the message as well to keep track of what you are sending out.
-
If enabled by the admin, students can send emails (including attachments) to the instructor.
Session Management
Our entire document covering session management Managing Sessions can be found in our Supplement Guide library.
In addition to referencing the above manual, below is a quick list of items to keep in mind, if you are given permission to manage courses:
Add/View/Edit
-
When adding or editing a session, the instructor can provide Notes in the designated area of the Session Details window to maintain information on the session. These notes are viewable to students when viewing the information from the course catalog.
-
If your system is set up to use external email, and the user does not have an email address, use the user’s manager’s email address in the student’s profile to alert or distribute the messages.
Wait List
-
If a class is full, the session listing will show in red on your list of sessions.
-
If the class has a waiting list, it will not show in red, but there will be a Waiting list icon to the right of the word Full ( ). If you click on the icon, the students who are on the waiting list will be displayed.
To allow all the students into the class, you could simply increase the maximum number of students allowed in the session and the next students on the list will automatically be enrolled.
Or you choose who to delete and who to register.
-
Anyone who is deleted from the wait list (meaning they cannot get into the class) will get a notification letting them know they are removed from the wait list if that particular notification is turned on.
-
You may register a student that was on the wait list by clicking the Register button in the top navigation panel and selecting their UserID. If you register them, they will automatically be taken off the wait list and registered in class. If you register students in a class that is full, you are overriding the class size purposely which will show in the details of the session.
-
Instructor/reporters can register students in a class that is full and not cause the waiting list to be activated. However, if students register for a class that is full, they will be added to the waiting list.
Delete
Once records are deleted they can only be recovered from a back-up file. For ELB Learning hosted customers, the last 15 days of activity is readily available as well as Audit reports, available only to administrators that can provide great detail. A warning message is provided during the Delete process requiring the user to confirm the deletion.
Notifications
-
Your session notifications can be personalized to the particular session of the course. You can include CourseMill variable names in your message. Click Help to see a list of available variables.
-
Email notifications will be sent from the instructor’s email address. If there are no Instructors, it will come from the administrator’s email address.
-
The CourseMill email management service must be enabled for notifications to function. Depending on how your system is set, notifications will come through in one of two ways:
- External Email service - notifications will be mailed to the email address specified in the User profile
- Internal CourseMill email service - notifications will be displayed in the users Mail tab on the student interface
Class Roster
Selecting the Class Roster button produces a report which lists all registered students in the
course session. It can be printed and used for student signatures when they arrive for class.
Gradebook
-
Selecting the Gradebook button displays the students in the course session as well as the content/Gradebook items. It can be used to update the student’s status, course and/or completion date.
-
For instructions on use of the Gradebook, see Using the Gradebook. Prior to referencing this manual, here is a quick list of items to keep in mind, if you are given permission to grade students:
-
When adding content (in Manage Courses), you would have entered the Gradebook ID name and Gradebook Item for the course.
- Gradebook Item - no content
- Auto graded content
- Manually graded content
- Not graded content
- Evaluation
-
The only course items that will need attention on the Gradebook when the course was created are the course items of Gradebook Item and Manually graded content.
-
Once you change the status for a Gradebook item, you can key in a reason for the change if it is something out of the ordinary. These comments can show up on the student’s transcript, if the managed property is set by the administrator.
Register
-
To register students, select the Register button on the Manage Sessions page.
-
If there is a large unmanageable list of students to select from, narrow the student list by using the Filter button to drill down even further and find students more quickly.
Mail
Selecting the Mail button will allow you to mail any or all the students who have an email address that are registered in the session. You can also copy yourself on the message to keep track of what you are sending out.
Manage Keywords
Our entire document covering keyword management Managing Keywords can be found in our Supplement Guide Library.
If you are given permission to Manage Keywords, keep in mind that keywords are used to help in identifying a student’s career track. This is done by creating a list of career track titles before creating the actual keywords. Curriculum or Courses can appear in multiple career tracks.
Manage Users
In addition to referencing the above manuals, below is a quick list of items to keep in mind, if you are given permission to manage users:
Add/Edit
-
Student is the default role when a new profile is created. However a student can also be an instructor/reporter or reporter by selecting those respective privileges.
-
Selecting the privilege Guest restricts the user to view course material only. No data is tracked for a Guest account, so no record of Guest activity is maintained. Guest accounts cannot be modified once they are created. Once Guest account is usually set up if you are selling training to the public and you would like the public to have an account to browse your catalog.
-
User ID must be alpha numeric only. The only exception is an "@" character and “.” within a correctly formatted email address
-
Language Preference: This will determine the language displayed for the overall user interface. This does not apply to the language for courses as that is determined by how the course was designed.
-
CourseMill may be configured to allow users to update personal data, organizational data or both based on the requirements of the organization. This is a configuration option in Manage Properties.
Delete
Once records are deleted they can only be recovered from a back-up file. For ELB Learning hosted customers, the last 15 days of activity is readily available as well as Audit reports, available only to administrators that can provide great detail. A warning message is provided during the Delete process requiring the user to confirm the deletion.
Gradebook
For instructions on use of the Gradebook, see Using the Gradebook.
Register
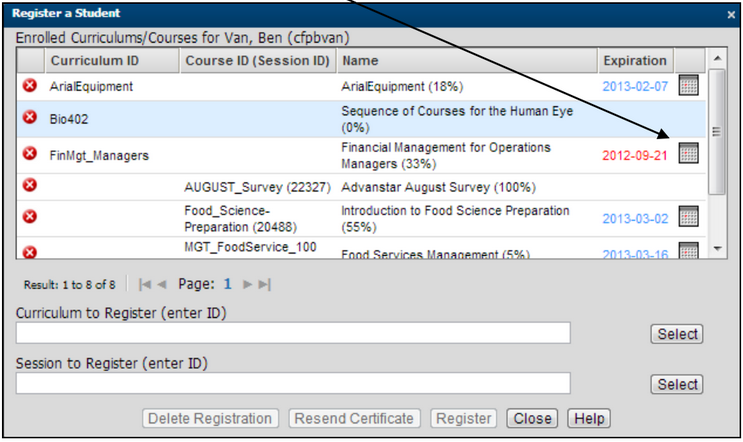
Registration here works the same way as in curriculum and course. However, in this case all the courses and curriculums the student is currently enrolled in will initially display. If any of the courses or curriculums are overdue or expired, you may extend the date by clicking on the calendar next to the red expiration date and selecting a new date. Selecting a new date will allow the student to continue to have access.
Batch User Data
While in Manage Users, you can use the Batch User Data button to perform the following functions:
-
Import User Data
-
Export User Data
-
Bulk Unenroll Users
-
Bulk Delete Users
-
Bulk Archive Users
-
Bulk Restore Users
It is highly recommended you refer to the training document for this function, Batch Managing User Data.
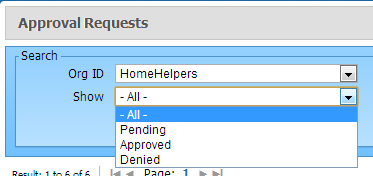
Approval Requests
If a student has attempted to enroll in a course or a curriculum that requires approval, once they click enroll, they will see a message in blue in their course catalog, letting them know they are waiting for approval. Instructors and reporters have the ability to then go into the Approval Requests area to approve or deny a student enrollment.
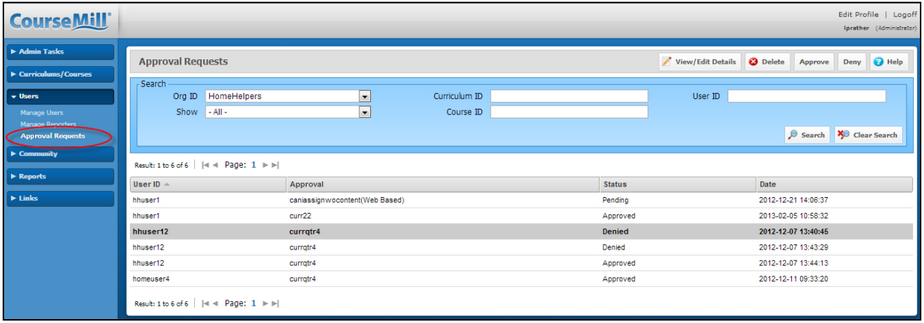
When first entering this screen, all approval requests will be displayed. The list can then be narrowed
down to only those requests that are still pending by selecting Pending from the drop-down list of the
Show item:
Approve/Deny
-
Once you highlight a line showing a student pending in either a course or a curriculum, you can approve or deny one of two ways:
-
Click View/Edit details in the top navigation panel. This will display the screen below in which you can select Approve or Deny from the drop-down list as shown in the red arrow. This also allows you to enter a comment as to why you are approving or denying. Click Save to complete the process.
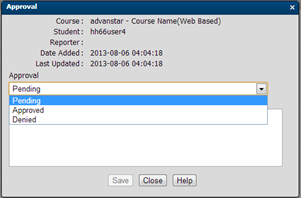
-
Click the Approve or Deny button in the top navigation panel. This will not allow you to enter a comment in the Notes item.
-
If approved, the course will move from the student’s course catalog to their My Courses tab to launch when ready.
-
If denied, the blue message will go away and the course will return to its normal state in the Course Catalog.
Delete
Be careful when deleting approval requests. If you delete an approval request that is pending the students request will be ignored and the course they were asking approval for will go back to its normal state in the course catalog as if they never tried to enroll. In this case, they will need to enroll again, which will again send an approval request.
Community
If you are using discussion boards, as an instructor/reporter, you might want to monitor postings and keep the discussion current. When community boards are not kept current, the desire for students to post decreases.
Reports
Our entire document covering reports, Reporting, can be found in our Supplement Guide library.
Prior to referencing the above manual, below is a quick list of items to keep in mind about reporting:
-
There is a list of General reports that are available to you along with Parameter-Driven reports.
-
As an instructor/reporter, you only have access to the course, curriculum, and user General reports.
-
The parameter driven reports have various additional fields you can select to filter your report even further (particular courses, students, and so on) depending on the type of report.
-
The parameter-driven reports also have four to five check boxes at the top of each report to allow you some flexibility in reporting information:
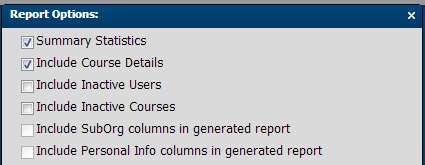
If Summary Statistics is not checked, a more detailed report is run.

|
Print Default: Be aware that there is a default of 10 columns to a report before you are not given the Print option any longer. This default can be changed by your administrator. For example, if you change it to 20 and the report has 21 columns displaying, the Print option will not display. But if the report has 20 or less, the Print button will display allowing you to print the report.
|
Report Locker
Use the Report Locker to set up reports to run on an automatic schedule. As an instructor/reporter you will not be able to copy additional people on your report – only administrators can set up that feature.
Support | About ELB Learning
© ELB Learning 2022