Managing Courses
A course in CourseMill is like a container into which the course content will be uploaded. Each Course ID is unique to the site and may be assigned to individual students or to groups of students in a Sub-Org. As an administrator, you define the rules of the course and grant permissions to the instructors/reporters who can manage the course and its content.
Course Menu
The Manage Courses menu ribbon provides the following options:
| Add Course
|
Opens the Course Details window to build the framework of the course and its functionality. |
| View/Edit Details |
Opens the Course Detail for an existing course. |
| Delete |
Deletes a course.

|
We recommend you inactivate the course, which will remove it from enrollment for students. Deleting a course will cause all student history for that course to be deleted. |
|
| Notifications |
Provides the ability to turn on/off pre-set, customizable notifications regarding the workflow for a course. These notifications will be sent to the student using the email system that was selected for the course, from the Instructor’s email address. If there is no Instructor, the email will come from the system administration email address.
|
| Content |
Provides loading of SCORM/AICC content, creation or additional non-SCORM/AICC content, or posting of course related files (resources). |
| Gradebook |
Allows instructors the ability to change the student’s status or score in a course.
|
| Register |
Allows instructors/reporters (who have been given permission) to register students or organizational groups in the course.
|
| Mail |
A messaging system between course instructors and students. Based on CourseMill’s set-up, it allows email attachments. |
| Assign Course |
Permits re-occurring assignment of courses to entire organizational groups as they are created within CourseMill. For example, you may want to assign all users in the ACCTG sub-org to the Accounting_Adv course. Any new user that is added and defined in that sub-org will automatically become enrolled which will display that course in their My Courses tab on the student interface.
|
|
The manage property AutoEnrollAssignCourses must be set to Yes for Allow Auto
Enrollment to function. If this is set to No, the course will still show in the user’s catalog, but the users
will NOT be auto-enrolled in the course. |
|
| Help |
Provides access to the Help documentation.
|
Course Search Area
The Search area at the top of the screen provides the ability to easily find courses when the list of courses becomes too large. Use the controls as follows:
| Org ID |
Org ID under which the course is registered. |
| Course ID |
Enter any combination of letters/numbers to search for any courses that contain that combination in the Course ID. For example, if you have two courses, one with an ID of “Accounting” and the other with an ID of “FingerPaint”, your search for “ing” will display both courses.
|
| Title |
Enter any combination of letters/numbers to search for any courses that contain that combination in the title. For example, if you have two courses, one with a title of “Accounting 101” and the other with a title of “Biology 101” your search for “101” will display both courses. |
| Description |
Enter any combination of letters/numbers to search for any courses that contain that combination in the description. For example, if there are two courses, one with a description of “Accounting basics to get you started” and the other with a description of “Biology basics to get you started” your search for “started” will display both courses.
|
| Include Inactive |
Enable this check box to expand your list to include not only the active courses, but also the inactive ones (those without a checkmark in the Active check box. For more information, see Adding a Course below. |
Adding a Course
Courses are unique to the site by Course ID which is used to select and sort CourseMill courses in catalogs and reports. A management naming convention should be devised to organize courses based on the Course ID. For example, “ACCT_Budget_Structures” would sort all Accounting courses by the pre-fix ACCT.
Any administrator, instructor or reporter who has been given the permission, can add courses. To add a course to your organization, select Manage Courses on the left navigation bar, then click the Add Course button.
Complete the following course information to define your course.
|
|
By default, when you add a course, a session will automatically be created. This default session will initially be named “Web Based” with a location of “Online”. You can choose to change that to your liking, however, do not delete it. Every course must have at least one session. If a course does not have at least one session, you will run into problems.
|
Add or View/Edit Course Details - Course Tab
-
Course ID should reflect a sequence numbering system suitable for registration and reporting.
-
The Active check box defaults to enabled which displays the course in the Course Catalog. Un-checking the Active check box marks the course as inactive. Making a course inactive either means it is not ready for display or it is an older course which is no longer offered for enrollment.
-
The Name and Description of the course are required.
-
Notes provide an area for the instructors to maintain information on the course. This information is viewable to students.
Add or View/Edit Course Details - Details Tab
-
Course Type allows you to specify whether this is a Web-based/online course or whether it is an instructor-led course.
-
Credit Hours allows for credit to be earned for the course. Credit Hours may be credit or CEUs.
-
Student Invitation URL – This URL is automatically generated and can be used to copy and paste in an email if you want to send out invites to students to take the course. This URL will take them directly to the CourseMill logon screen to allow them to log in and will then direct them to the catalog to enroll in the course. It does this by placing the CourseID in the Catalog ID search field to only display that course when displaying the course catalog.
-
By Enrollment Only – if you select this choice, students will not be able to self-enroll in this course.
-
Allow Self-Registration or Self-Registration allows a student to see the course in his or her catalog and to self-enroll in the course.
-
If you enter an access code, the user will be prompted to key in that access code when he or she clicks the Enroll button. If you assign courses to SubOrgs, (see Assign Course below) only those students in those SubOrgs will see the course in their catalog.
-
Registration Requires Approval designates that this course requires approval to enroll. Once the user clicks on the Enroll button, the request for approval will be sent to the Manager and/or Administrator, to act upon. The catalog will display “Waiting for Approval” until approved or denied.
-
Allow Auto Enrollment for Matching SubOrgs allows you to auto enroll groups of people by SubOrgs.
-
You must have the managed property AutoEnrollAssignedCourses enabled for this to work.
-
If this is checked, any users matching the SubOrgs defined by the rules set up on the Assign Course tab will be automatically enrolled in the course. If you have no assigned rules set, no one will be auto-enrolled. See "Assign Course" further down in this document.
-
If this is unchecked but you still have rules set up in the Assign Course tab, those users will be the only ones to see this course in their catalog so they can self-register.
-
Course Width and Height can be changed to accommodate different screen sizes. This is usually adjusted for mobile courses. We recommend always allowing for re-sizing.
|
|
The system will automatically set the Course Local Dir and the Course HTTP Dir which specifies the server content location. The Content screen size and display rules define their operation in a browser window. The defaults for Course Local Dir and Course HTTP Dir are set in the Manage Properties. |
Add or View/Edit Course Details - Due Dates Tab
-
Course should be completed after this
number of days encourages a time period to
complete the course. Once enrolled in the
course the student has this no. of days to
complete it or it will show as overdue on his
student interface. Because this is a due date
only, it does still allow the student to access
the course even though it is overdue.
-
Course expires this number of days after
enrollment establishes the timeframe that
the student is required to complete the
course. Once the course expires, it will
display in red on the student interface, and
the student will need to contact the
instructor to re-gain access to the course by
extending their expiration date.
|
|
The actual course Due Date is derived by adding the number of days to their enrollment date. The Due Date displays under My Courses for the associated course. |
-
Re-Enroll in course after this number of days indicates this is a certification program that is good for only a period of time, and you wish to automatically re-enroll users to ensure they continue their certification on an on-going basis. Enter in the number of days that you want CourseMill to re-enroll the student after the student has completed the course. If there are no days entered in this field, the re-enrollment will not occur.
In the above example, a student is taking a Project Management certification course. They should be re-enrolled 275 days (9 months) after the day they complete the course (because we want to give them 3 months to prepare for next year’s certification). They should complete the course in 90 days. If they do not – we can send them a warning notification that they should be completing it soon (See Notifications section below). But if they do not complete it in time, they will still have access to the course until they complete.
Other Samples:
| When the student chooses to certify themselves |
Date Enrolled
|
Date Completed (even though it usually takes 90 days). Certification good for one year.
|
Re-Enrollment Date (275 days later)
|
Days to work on the course to re- certify for the next year.
|
| Debbie: Jan – Dec |
1/1/14 |
2/20/14 |
11/20/14 |
3 months
|
| Mike: Mar – Feb |
3/1/14 |
3/30/14 |
12/30/14 |
3 months
|
| John: June – May |
6/1/14 |
8/15/14 |
5/15/15 |
3 months
|
When a student is re-enrolled into a course by the system, their transcript will note this activity. Be aware that the transcript defaults to showing a summary which will not show that specific re-enrollment activity. In order to see re-enrollment activity, be sure to click the Options button, uncheck the Summary Transcript check box and then click the Run Report button to reproduce the transcript.
The Automatic re-enrollment for certification comment can be seen under the specific course.
|
|
The Automatic re-enrollment for certification message can also be seen in the student’s Gradebook by selecting the  comment graphic next to the course name. comment graphic next to the course name.
Clicking the comment icon brings up the course Comment window.
|
Add or View/Edit Course Details - Community Tab
-
Chat Support and IM Support details can be selected.
-
Discussion Boards can also be enabled, either internally within CourseMill or point your users to an external discussion board you have set up. If you enable a discussion board at the course level, a discussion board at the session level will also be automatically created.
-
Email Support can be enabled as well, separate from how it is established at the Org level.
The Community feature restricts communication to only those users registered in the course.
|
|
The default for each of the Community items is set in the Organization table. CourseMill can disable these entirely or allow for these to be enabled within the course, curriculum or session.
|
Add or View/Edit Course Details - Prerequisites Tab
-
Courses available to be made a prerequisite to a course will appear in the column on the right.
-
To add a course to the pre-requisite list, select a course in the Available Course(s) list, click the <<< button and the course will appear in Prerequisite Course(s) list.
-
To remove a course, select a course in the Prerequisite Course(s) list, click the >>> button and the course will appear in the Available Course(s) list.
|
|
Prerequisites block students from accessing the course content prior to completing that prerequisite. Assigned or self-enrolled courses that require a prerequisite will appear on My Courses, but cannot be accessed until the prerequisite is fulfilled.
|
Add or View/Edit Course Details - Instructors Tab
-
Instructors available for assignment to a course will appear in the Instructor(s) Available list.
-
To add an Instructor, select an instructor in the Instructor(s) Available list, click the <<< button and the instructor will appear in Instructor(s) Assigned.
-
To remove an instructor select an instructor in the Instructor(s) Assigned list, click the >>> button and the instructor will be removed.
|
|
If no instructors are assigned, Course Notifications will come from the system administrator. If multiple instructors are assigned and an email notification is being sent, it will come from the first instructor in the list.
|
Add or View/Edit Course Details - Tags Tab
|
|
Course or curriculum tag comparison tracking is available to administrators through Curriculums/Courses > Manage Tags.
|
Add or View/Edit Course Details - Course Info
This tab will only display if the administrator has set up categories for courses in the Manage Org area. The categories set up for courses will display here (for example, Author) so data can be filled in for this particular course. Up to eight categories can be defined at the organization level. This data is only available in custom reporting that you create.

|
Course Info can be used for administrative tracking for each course.
|
Course Notifications
There are 12 types of course notifications.
-
To modify the contents of each notification click the pencil icon.
-
Each notification contains sample content. This can be customized to your preference.
-
The notifications that have numbers in the title can be defined with a managed property. The administrator is the only one that can set this up. You can define any number of days for each notification.
|
|
See the table below for the various managed property settings for these types of notifications. |
-
Variables are field names that can be pulled directly from CourseMill’s database to personalize messages. They appear as a <> as shown to the left.
-
Click Help to view a complete list of available content variables and their exact spelling.
|
|
-
The Course is Completed Notification is what drives a physical paper certificate to be created for a course, if one exists. The course can use the standard certificate, or it can have a course-specific certificate by creating a PDF file named the same as the Course ID. This PDF file must be loaded on your server. (See Working with Certificates for more detail.)
-
The Entry Made in Discussion Board Notification sends an email to the course instructor as well as anyone else who posted in the discussion board .
-
Notifications that are turned on at the session level override notifications at the course level. Notifications that are turned off at the session level are overridden by the course level notifications.
-
The CourseMill email management service must be enabled for notifications to function. If your system is using an External Email service, the notifications will be mailed to the email address specified in the User profile. If the system is using the Internal CourseMill email service, the notifications will be displayed in the users Mail tab on the student interface.
|
|
|
If the typical user does not have an email address, use the manager’s email in the student’s profile to alert or distribute the messages or set CourseMill email to be Internal Only allowing the user to read email messages when they log in.
If turned on, seven of the 12 notifications are sent immediately upon the corresponding action. For example, when a student is enrolled in a course the corresponding notification is sent immediately. This is true if the Instructor/Administrator performs the enrollment, or the user self-enrolls. This is also true if existing users are Auto-Enrolled as well as future students that will match the Auto-Enrollment rules.
However, the other five notifications are scheduled for distribution by setting up a managed property directing CourseMill when to send the notification. They are actually sent during the nightly Notification Maintenance run Admin Tasks > Manage Scheduled Tasks > Notification Schedule). These five are shown below with their corresponding managed property that the administrator will need to set up.
|
Managed Properties to set for the Various Types of Notifications:
| Notification |
Managed Property
|
| Nn,nn,nn,nn prior to the start of the course |
CourseNotificationDays – specifies the nn values
|
| Nn,nn,nn,nn prior to end of session reminder |
SessionEndWarningDays - specifies the nn values
|
| Nn days after completion of the course |
SessionFollowUpDays - specifies the nn values
|
| Nn,nn,nn,nn prior to the course due date |
DueDateApproachingDays - specifies the nn values
|
| |
DueDateWarningThresholdDays – specifies the number of days prior to the due date that the Yellow/Red visuals show up in the My Courses area
|
| Nn,nn,nn,nn after the course due date |
DueDatePassedDays - specifies the nn values
|
Course Content Setup
Follow these steps to set up a course:
-
Import content package
-
Add content/gradebook item
-
Add Resources
Courses can be set up with a variety of content items (SCORM/AICC courses, Word, Excel, Powerpoint, for example). There are over 300 file types that CourseMill will accept.
Shown below is an example showing a variety of items and how they can be utilized inside a course.
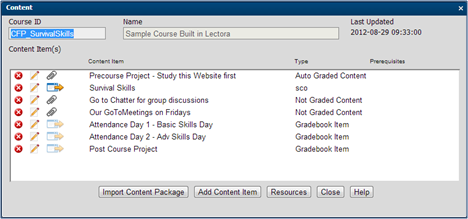
Here is a breakdown of the list of items in the example:
-
Pre-work that needs to be done first by simply studying a particular website. Once the student clicks on the launch (paperclip symbol) to go to this website, the system will auto-grade it as complete.
-
The actual Survival Skills SCORM course that will be scored according to the course content and SCORM standards as the student takes the course.
-
An invite to a chatter session for the group to collaborate.
-
A Weekly GoToMeeting invite.
-
There are two days the class gets together to practice basic and advanced skills. Here the Instructor simply tracks their attendance by marking that item complete when the meeting is over and they have attended.
-
The class has a project to perform before they will pass this course. Once this project is manually turned in to the instructor, the instructor can then grade it.
Import Content Package
-
Import any SCORM 1.2 or AICC compliant, zipped content packages into a course. Select Browse to find the file and click Import Content Package to upload.
-
If you want to replace a content item already loaded into the course, click the Replace existing imported items check box to do so.
|
|
Caution: If you have more than one SCO in the course
content, and you have this box checked, the SCO you
are importing will replace ALL other scorm content in
the course.
If the SCORM/AICC content that you are replacing has a different ScoID or TitleID (in Lectora the default is “I_A001” ), then you will receive a warning that you are about to replace content with entirely new content and therefore will delete all student history for this content item. If you really want to do this, there is an override, by checking the Ignore Gradebook ID Mismatch check box. This warning message was created to prevent errors that were easily made by mistake.
|
|
|
|
-
Lectora users can publish content directly from Lectora to CourseMill. When this is done, the content package is automatically uploaded into the CourseMill course, and a separate import process is not required. See Processing SCORM-Based Content for Lectora to CourseMill set-up. Also see Publishing from Lectora to CourseMill.
-
Once users are enrolled in the course, the SCO name (Gradebook ID) cannot be altered. If it is, all history is lost and the student will need to start the course all over again. Often times the Gradebook ID name comes from your authoring tool, so make sure if you are uploading a new version of a course that the SCO name in the authoring tool for the course is the same as CourseMill’s Gradebook ID.
-
Each imported content package will automatically receive a score and completion status based on the users’ actions within the course content.
|
Add Content Item
-
Create a Gradebook ID, students will not see this.
-
Create the Content Item name, the students see this.
-
Select the Type. Based on the type selected another field
will open up asking for a URL or file name.
The five different types of Gradebook items are as follows:
| Auto Graded Content |
When the student launches the content, CourseMill will
automatically mark the grade as Complete. |
| Manually Graded Content |
When the student must complete an action and the Instructor
must manually grade the item. |
| Not Graded Content |
When the instructor wants to provide a content item (for
reference) and does not need to grade that action at all. When the student opens up this content, his
content grade will be marked as “Browsed”.
|
| Gradebook Item (No Content) |
There is no content for the student associated with this item –
however the instructor would like to track it. This might be used
for attendance, for example. |
| Evaluation |
This does two things:
-
Puts a block on the student to prevent him from
continuing on to the next content item until the
manager/instructor evaluates him.
-
Specifies a SCORM course for the manager to take that
will log the evaluation score he provides in the student record. See Forcing Evaluation Blocks in a Course for more details.
|
The instructor would take action on each course item using the Gradebook. See Using the Gradebook.
-
You can change the order that this item is listed in the course content by selecting the order drop-down box.
-
Upload the file - browse for the file you want to upload and click Save.
|
|
-
The check box above the file name is only used
for special occasions when you might have extremely
large files to import and you load them into a file on the server.
-
If you are loading zip files , (possibly for an HTML course), you will need to
check the Unpack Zip File check box.
|
Resources
You can attach resources to your courses so participants in the course will have access. These resources are not graded and therefore do not correspond to the completion of the course. For example, this could include a document with assignment descriptions, a course syllabus, or any other supplemental information course participants should have. Make sure the file format is accessible by the applications on the users' devices.
To add a resource, select the Resources button on the course Content dialog.
Then click the Add button.
-
Add the resource Description. Keep in mind the resources display in alphabetical order.
- Add the Version number using your numbering convention.
-
Set resources to be visible only to instructors by disabling the Allow Student Access check box.
-
Browse for the resource and load the item into CourseMill. The resource file cannot be larger than 500mg in size.
|
|
You can attach the zipped file of your course so you will always
have access to the actual course program code. Be sure to un-check Allow Student Access. |
Once resources are loaded you can click View/Edit Details to make any changes.
|
|
If a student has not opened (viewed) a resource, from within the course on the My Courses tab, an icon will display to the right of the resource stating that it is new and will stay there until the document is
actually read.

If a resource was updated since the last time the user opened (viewed) it, there will be an icon to the right of the resource stating that it had been updated.

|
Course Gradebook
In general, you should typically grade students in sessions, not courses. A student should always be registered into a valid session. If not, it is because he hasn't enrolled in a session, yet, and therefore not ready for grading anyway. See Note below.
All students registered in the course will display in the Gradebook. You can narrow the list down by using the Filter button.
-
Select the course you want to grade.
-
Select the Gradebook Item.
-
Select the Status from the drop-down.
-
Enter the Score value.
-
Enter the Completion Date (if left blank, if will default to today).
-
Enter the Reason for Change to the Gradebook. In managed properties IncludeReasonForGradebookChanges, this can be set to optional, required, or hidden. .If keyed in, the student will see this on his or her transcript. This can also be changed with the managed property ShowGradebookCommentsToStudents.
- If a course has been completed and a Certificate is available, one click Resend Certificate will allow an instructor and email that certificate notification to the student.
|
|
If you happen to see a session ID such as -1 or -2, it means that either the session that the user
was previously enrolled in no longer exists (-1), or that the user is registered for the course but has not
selected a session yet (-2). You should first wait until the student has chosen a session or correct the
problem before trying to grade – as entering grades for a student in a -1 or -2 session will not work. |
Registering
In general, one should always register students in sessions, not courses, if that is possible. If that is not possible because the student needs to select the session, and you wish to register students at a course level, continue reading. Make sure the course does, indeed, have a session associated with it before you register. If not, the student will be asked to enroll in a session when launching the course, and no sessions will display.
Anyone who has permission to register students can do so here.
-
The initial screen displays all the students currently registered for the course.
-
The Select button opens a window and displays all students available for registration in this course.
-
Select one or more users, use Ctrl and/or Shift for multi-selection.
-
Register By SubOrg opens a window to create filters for specific organizational values.
|
|
Use the red  icon to remove users from the list. When removed all enrollment records for this course for the user will
be removed from CourseMill. Use this with caution as the records cannot be recovered. icon to remove users from the list. When removed all enrollment records for this course for the user will
be removed from CourseMill. Use this with caution as the records cannot be recovered. |
The Filter button will allow you to drill down even further by selecting a particular user by entering in one of four fields or SubOrg values. For instance, you might want to find those with the first name of George. This feature helps you quickly find people.
When registering by SubOrg,
select one or more values for
each SubOrg and then select
Register by SubOrg or Delete
by SubOrg. Delete by SubOrg
will delete that group of
students and essentially un-register them, losing all their course history.
Course Mail
-
Remove a student by clicking on the red .
-
Create the Subject, Message, and add attachments if you like.
-
Enable the Send copy of email to me check box if you would like a copy of the message.
- Click Send Message to complete the process.
Assign Course
Anyone who has permission to register students can do so here.
|
|
|
-
Users currently in the system will automatically be enrolled in the Course if their sub-org values
match the ones selected on the assignment rule. In addition, any NEW user loaded into Coursemill in the future that
also has matching sub-org values, will also be enrolled in this course as soon as they log in.
-
If you have the Enrolled in the Course notification enabled, both current and future users who
match will receive the email notification that they have been enrolled in the class.
-
If you no longer wish the rule to exist, you may delete it by clicking the . The students
who were previously enrolled in this course, based on the rule that you just deleted, will be un-enrolled
in the nightly batch maintenance run , if the Managed Property, UnenrollIfNotAssigned, is enabled.
The only time they will not be un-enrolled is if they have started the course already.
- Likewise, if a user’s profile changes and the user no longer has a sub-org value matching an assignment
rule, the user will be un-enrolled from the course when the nightly database maintenance runs and the
Managed Property, UnenrollIfNotAssigned is enabled. Again, they will NOT be un-enrolled if they have
started the course already.
-
The Manage Property AutoEnrollAssignCourses must be set to Yes to allow Coursemill to auto-
enroll students in the courses.
- If you have assignment rules set up, but have not checked the Allow Auto Enrollment for Matching
Suborgs checkbox on the course details screen, then the course will only show in the user’s catalog (for
those users matching the assigned sub-orgs), but the users will not be auto-enrolled in the course.
|
Auto Enrollment Setting Dependencies
This table shows various scenarios you might have in auto-enrolling courses. This assumes you have:
-
Turned ON the Managed Property, AutoEnrollAssignedCourses, and
-
You have set up a rule in the Assign Course area.
As described above, three very important settings come into play when auto-enrolling courses. The Managed Property settings are site wide so they affect all Orgs and can only be turned on or off by your global administrator.
|
Scenario
|
|
Auto Enrollment for Matching Sub-Orgs Check Box
|
Managed Property IgnoreSubOrgRestrictionsForCoursesInCatalog
|
|
To auto enroll users in a particular sub-org and not show it in the catalog for viewing
|
OFF
|
YES
|
NO
|
|
To auto enroll users in a particular sub-org, but also allow anyone else to see it in their catalog to enroll in if they want
|
ON
|
YES
|
YES
|
|
To only show the course to a particular set of users in their catalog but allow them to enroll themselves
|
ON
|
NO
|
NO
|
Duplicating Courses
Access using Right-Mouse Click
-
The Duplicate Course selection from the drop-down list is not a tab selection across the Manage Courses menu ribbon. This function allows you to select a previously built course and duplicate it including all content. Once you click Duplicate Course, the following screen will display. By default, the system appends a “-1” to the Course ID because it has to be unique. The “-1” can be changed to anything the user wants to change it to.
-
This option is only available to administrators.
-
When duplicating a course, all content, notifications, and the course certificate will also be duplicated (the .PDF and .INI files).
Help
Select the Help button from within each topic of the course for context-sensitive information.
Support | About ELB Learning
© ELB Learning 2022
